Ergonomics First, Aesthetics Second
Believe me, I get it. You want to design a PC desk that screams “baller” and flashes RGB goodness, highlighting your top-of-the-line PC components. That’s awesome. But the first thing to remember is that you will be sitting at this desk for hours at a time and with those extended sessions in mind, you need to ensure that the desk is ergonomic and custom-fit to your physique and needs.
Desk height is an important part of this. Manufactured desks are usually made to a height that has been determined to meet the needs of the masses, not the individual. You will want to take the time to determine the proper height for you which is actually pretty simple. Just sit in the chair you will be using, sitting with your back straight, and hold your arms out as if you are typing with your forearms parallel with the floor. Have someone measure the height from the floor to your hands and you’ll have a pretty good idea of the height you want your desk to be. Considering each person’s ideal desk height is unique to them, you may want to consider building the legs for your desk instead of buying pre-manufactured ones.
Your next consideration should be knee and leg movement. Because the tops of Desk PCs are by their very nature deep, you want to plan for a design that does not inhibit lower extremity movement.
Have a look at the front of our first desk PC design. Had we not planned for a knee cutout, it would have been very uncomfortable to sit at this desk. Not only would there have been challenges with knee movement but the armrests for our gaming chair would not have fit under it.

There are other ways to approach this including a recessed front similar to the Lian Li DK-05. The point is to plan for comfortable extended work sessions in your desk design.
Airtight, Exhaust-Focused, Controlled-Airflow System
If there is one area that I could point to as a critical long-term consideration in your desk PC design, it would be airflow. This is the most overlooked and misunderstood element of PC case design in the industry.
As a rule, an exhaust-focused design that pushes hot air out of the system actively (with exhaust fans) and pulling cool air in passively (meaning no intake fans) is more effective at actually maintaining cooler ambient temperatures within a system case.
Unfortunately, due to inherent design flaws, traditional PC cases lack the ability to prevent dust intake when incorporating an exhaust-focused approach. With a DIY desk PC case, however, we have the ability to purposefully control virtually all air movement through the case by ensuring an airtight design with filtered, unassisted intakes (yes, that means no intake fans). This is the most efficient and effective airflow solution available for a desk PC.
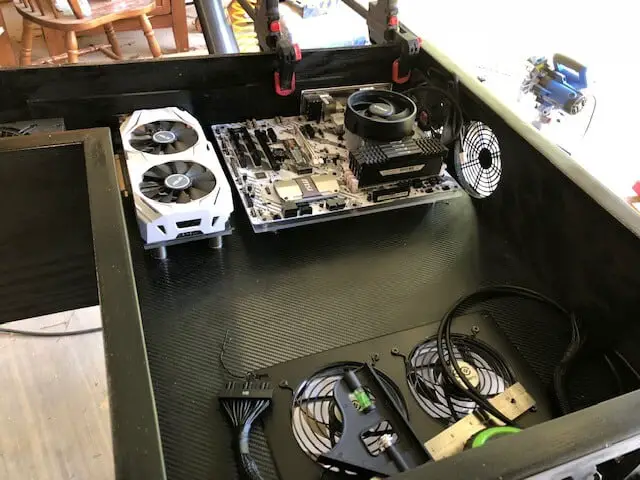
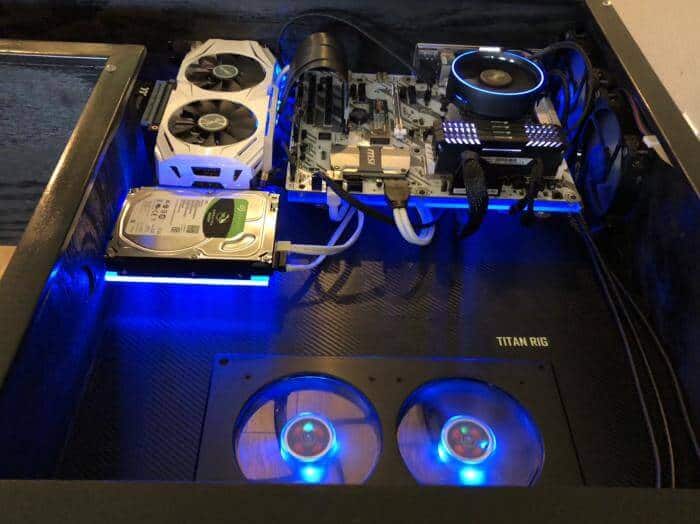
Plan PC Component Placement For Proximity, Expandability, and Artistic Design
While it’s fun to think of all the creative ways that you can lay out your PC components in your desk PC, it’s important to prioritize placement. What I mean is, certain components need to be closer to the motherboard than others. Hard drives, for example, should be installed relatively close to the main system so as to prevent data throughput degradation caused by long SATA cable runs. Graphics cards are another consideration. Although it looks great to use a riser extension cable to place the card next to the motherboard instead of on top of it, there is only so far away that you can go.
When it comes to liquid cooling, you have a lot more freedom. Pumps, reservoirs, and radiators can be spread out throughout the case with little concern for its
Aside from proximity, we also have to consider expandability. While your initial setup of hard drives may seem more than adequate, for example, the time will come when you’ll find yourself in need of more space. Additional graphics cards are another expansion possibility to consider. By allowing ample room for future expansion, you’ll save yourself frustration in the future and ensure a future-proof layout for your components.
The final consideration is aesthetics. Once you are certain that you have allowed for appropriate proximity of components and are comfortable with the future expandability of the workspace, it’s time to play with the look of the layout itself. This is strictly a matter of taste. If you want the hard drives lined out beside each other or you’d like one on each side of the motherboard, so long as it does not impede on other components you can have at it. Make the system reflect your own personal style.
Use Furniture Grade Wood or MDF
We built our first Desk PC with plain old pine plywood and thought it came out looking pretty good, I’ll advise against following our original thought process. The plywood was inexpensive and easily available at a local lumber yard so convenience took priority over a long-term cost-benefit analysis.
Had I really thought it through, I would have opted for MDF for this build. The material’s
Read this post on building with MDF vs Plywood.
For our next desk, we are planning to use furniture-grade birch because we are considering staining it. Certain types of MDF can be stained but I’ve read a lot of mixed reviews on doing this. So my recommendation is furniture-grade wood for staining or painting, MDF for painting only.
If you are dead-set on staining MDF, have a look at this video on the topic.
Fit The Glass To The Desk, Not The Desk To The Glass
I realize the idea of buying cheap, second-hand glass from a table or desk is appealing. Linus Tech Tips made this approach somewhat famous in the DIY Desk PC community. But the problem they ran into you, and I’m afraid you will experience as well, is in trying to build a desk around the glass. This is more difficult than it sounds and stands to be very frustrating. Can you imagine taking the time to build your desk and realize the glass doesn’t fit? By designing and building your desk the way you want it from the beginning you will not have to make compromises later or deal with unsightly misalignments of the
Use Tempered Glass for Safety
I opted not to invest in tempered glass because it was more expensive but considering the potential safety hazards of broken non-tempered glass, you would be well advised to not repeat my cost-saving, short-sighted error. I have provided a lot of information on tempered glass in my previous post, How Much Does It Cost To Build A Desk PC. And I can guarantee that our next desk PC case will have tempered glass.
If you really want to visualize the difference in how tempered glass and regular glass shatter, watch this video of a guy shooting each with a shotgun.
Check for Square and Dry-Fit Before Gluing
Sometimes we overlook the obvious. This is not only best practice but should be an absolute checkpoint in your build. Take the time to dry fit the desk and make certain that it is square and level.
The easiest way to dry-fit your build is to place the bottom of the desk on the floor or a solid, level surface. Next, begin placing the sides, back, and front panels in place and use any heavy object to hold them in place (we used weights from a workout bench). Work slowly with each side to make certain that it is positioned at a 90 degree angle to the desk bottom. The simplest way to do this is to use a speed square.
Once you have all sides squared and secured with something heavy, double check the height of the desk at all corners and sides to ensure it is level. We used a 4 foot level for this. If you don’t have one that long you can use a shorter one on a metal bar or anything else that is perfectly straight.
This is our last chance to identify square and level issues before the desk goes together. If we can identify issues now they will be relatively simple to resolve. If we realize we have problems after the desk is glued and nailed, it’s a lot more complicated so take your time and do this.
Cross-brace For Stability
Have you ever leaned against a desk or table and felt it give and sway with your weight? This is not what you want from your DIY desk PC. Whether you choose to buy or build your desk legs, you’ll want to ensure that they provide a stable and sturdy foundation for your workstation. My son and I learned some valuable lessons about cross-bracing during our first build. Read this post to learn how we turned what could have been a wobbly desk pc into a rock-steady gaming machine.
Test All Computer Components Before Installing
Prior to installing your PC components, its a good practice to take everything out of the boxes, hook them up and make certain that everything works. While the chances of a DOA motherboard or graphics card is low, it can happen. Knowing that your components work will not only settle your nerves but will get you motivated to finish the build so that you can get everything up and running.
Manage Cables Under The Desk, Not Inside It
I’ll admit that I didn’t put the effort into cable management that I have seen many do. My OCD does not extend to unseen areas. Still, I knew I didn’t want all those cables running in the visible part of my build. I cut holes under the components and routed the cables through them. It was a simple process and made the inside of the desk look clean and organized. Just don’t look under the desk. 🙂
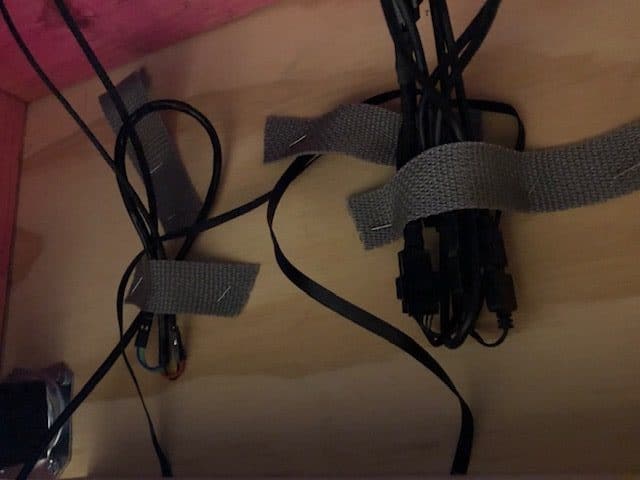
The reason I list this as best practice is that the inside of the desk is meant to serve as a showcase. Having cables running everywhere can take away from that unless you invest in custom length cables with custom sleeving. That can get really pricey. If it compliments the look you are going for then by-all-means have at it. But if you intend to showcase your build without highlighting the wiring system then routing those cables out of the desk and managing them underneath allows for a much cleaner look.
Ensure Synchronized RGB Through Brand Loyalty
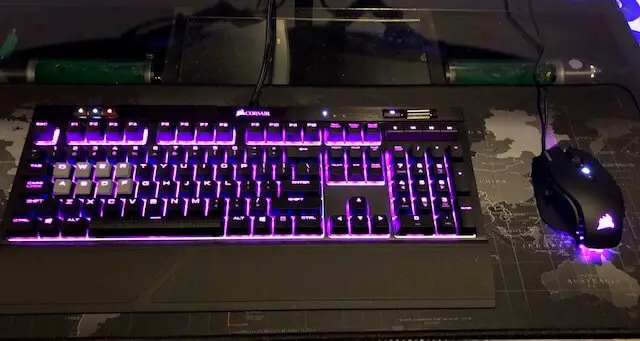
As a rule, I have no brand loyalty at all. I buy the product or service that suits my needs at the time. I don’t weigh in on the Apple vs. PC debate, for example. In my household, we have 4 iPhones, two
This realization first hit me when decided to buy my son a wireless gaming headset. I researched and read reviews until I needed glasses and finally settled on a pair that checked all the boxes. Just as I was ready to click “complete purchase” I realized that adding additional peripherals such as an RGB keyboard and RGB mouse would complicate matters if I chose another brand. Why? Because each requires a software program to manage the RGB lighting. If you mix and match, you end up in software hell.
In the end, I purchased each of the peripherals from the same company and ensured they were compatible with the same software. As a result, he has a seamless customization workflow for his desk PC gaming setup.
Well, almost.
As it happens, I’d previously chosen a different brand RGB hub for the desk PC itself. For now, he’s stuck changing that color scheme separately but I’ll be purchasing an RGB hub from the same brand that I bought his peripherals through in the near future. At that point, he will truly have RGB zen.
Here’s a video from the manufacturer’s YouTube channel on their RGB Hub and it’s features:
The point is this. There really are advantages with staying true to a product line at times. When it comes to RGB lighting, it’s brand loyalty or bust.
For more details on setting up your RGB lighting and the peripherals that we chose, read How To Add Synchronized RGB Lighting To A Desk PC Or Gaming Setup.
Accent Your Desk With A Theme
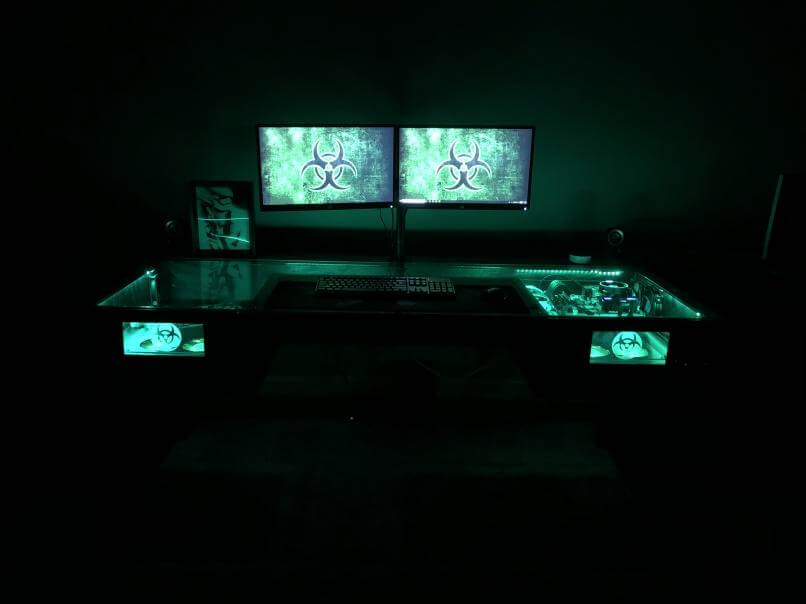
I find myself saying this alot but it really helps to think of your desk PC as a large shadowbox. It is a showcase for your PC components but it doesn’t have to be only for those. You can have collectables positioned throughout the desk if you wish. It could be whatever reflects your personality but it really adds something to the desk as a whole if you take the time to incorporate a theme into your build.
Here’s a list of ideas on creating a theme for your desk PC build.
If you really want to take your build to the next level, here’s some unusual mods that you can add to really make your creation stand out.
Finally, be sure to check out my step by step guide to building your own desk pc.