When it comes to modding a Desk PC, there are a number of ways in which you can customize your setup. Engraved Acrylic Panels, RGB lights diffused through frosted acrylic sheets, fan grills
While by no means an exhaustive list, below is what I hope will serve as a helpful resource for some of the more common modding gear that you may want to include in your arsenal.
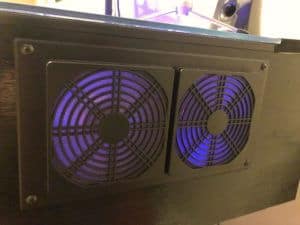
Exhaust Fan Grills

These actually come with both a mesh and wire grill covers. By using these we were able to easily hide the imperfections of our cutting while adding a clean and customized look to the fans in the case. Click here to get the latest pricing on these from Amazon.
We settled on the second option as we liked the overall look of it.
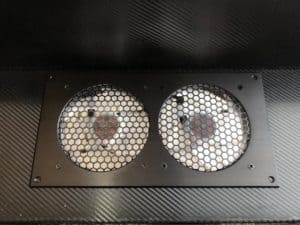
Intake Fan Grills (Filtered)

When it comes to pulling air into your system, you are going to want to ensure that you use a filtered air system. This prevents dust buildup inside the desk. Make sure you have plenty of filtered intakes!
We shopped around a lot and read a ton of reviews. In the end, we invested wisely with these filtered ventilation grills. The
The front panel comes off so that it’s easy to remove the nylon filter insert and clean it. Once it is clean you just reinsert the filter and snap the cover back on.
This was an Amazon’s Choice selection at the time that we purchased them. Click here for the latest pricing.
Bonus Tip – If you look closely you’ll notice that we used a frame from the exhaust fan grills underneath these. It gave it a little more fit and finish to make it better match the rest of the build.
Power Button For Your Desk PC Case

This is one of those inexpensive items that really make your desk PC a custom system. The way
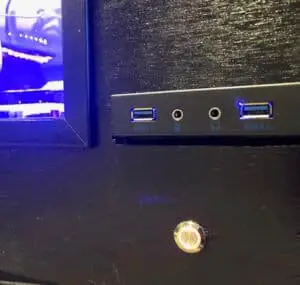
What you end up with is a simple power button that lights up when the system is powered on (you chose a red light but they have blue available too) and a simple, custom way to power up your gaming machine! You can get one of these from Amazon by clicking here.
USB 3.0 Front Panel Insert

You may also have noticed in that picture that we installed a dual USB 3.0 front panel module that includes a headphone and mic jack. This was a simple installation as well. The product came with the cutout dimensions and all I had to do was pull out the
USB Digital Thermometer For Case Temp Monitoring

So here’s a mod that I don’t have and wish I would have known about when building our system. Monitoring internal temperatures is very important so that you can make adjustments to your fan speeds to find just the right airflow strategy. We use a couple of old analog temperature guages in our desk but had I known about these we definitely would have included it.
This digital thermometer system is USB powered so it can be made to plug right into your PC power supply using a simple adapter like this one (which incidentally is the same adapter we use to power the plasma ball in our case).
It has a probe that can be discreetly mounted in a key area that you want to monitor such as under or around the motherboard. Cut out a hole in the front panel of your desk and mount the digital gauge and you have a rockin’ temperature monitoring system that makes your desk look just a little more awesome!
Graphics Card Extender Cable (To Mount Graphics Card Next To Motherboard)

One of the things that I was adamant about doing was mounting the graphics card next to the motherboard instead of directly into it. I thought this would give it a better look and also reduce the required depth of the desk. Plus, I loved that motherboard and didn’t want anything inhibiting the full view of it!
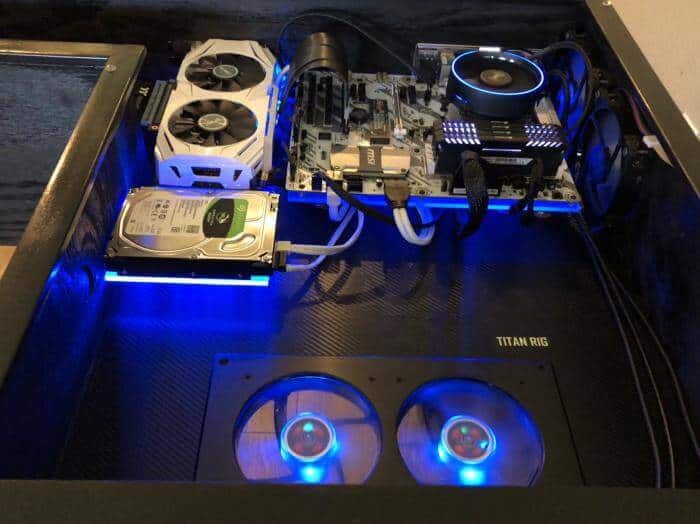
We did this using what’s called a PCI extender riser cable, a fancy way of saying an extension cable for the graphics card. This cable did the trick and we are quite pleased that we’ve seen absolutely no performance hit in using this.
Carbon Fiber Vinyl Wrap

We used a black vinyl wrap that is made for automobiles on the bottom interior of the desk. Because we were adhering the vinyl wrap to plywood we used some 3M tape primer made for vinyl. If you build with MDF you likely won’t have to worry with this step since it is so much smoother than plywood. It has a holographic pattern that really catches the RGB lighting (you can see it in the picture above that I used to show the graphics card cable).
We found cheaper versions of this type of product online but this was not an area I wanted to be overly thrify on. I knew that once the computer components were installed it would be a nightmare to have to take the vinyl wrap out and replace it if we bought a cheap brand that started coming up.

I’m glad we made the decision we did. It looks great and we have had zero issues with it. Best of all, if we ever have to take the glass top off and clean the inside of the desk it is super easy to wipe this stuff off. A great purchase for us and it really added to the look of the desk. Here’s a link to the carbon fiber vinyl wrap that we purchased on Amazon. You’ll also want to grab an inexpensive vinyl modding kit like this one. This is the same one we purchased and it made cutting and applying the wrap much easier.
Bonus Tip – I actually think it would look amazing to wrap an entire desk with this stuff. It would save a ton of time in painting and would look really sleek!
Cable Combs (For Ballin’ Cable Management!)

So many connections, so many cables. It can get out of control quickly. Keeping your cable management tidy from the start is the key to a clean and distinctive look for your system.
Cable combs like these on Amazon are a simple and inexpensive way to keep your cables in line while ensuring a clean look that emphasizes attention to detail in high profile areas. For under the desk cable management, the Amazon basics reusable cable ties are great because can be easily removed and reapplied when you are adding or replacing cables and wires. We used plain old nylon straps under our desk and I wish I would have used these instead. Live and learn. 🙂
Keep your cables under control and you will have a much better looking system overall.