I spent a great deal of time searching the internet for a desk that my son could use for his PC gaming setup. I began to run across these amazing computer-in-a-desk systems known as Desk PCs. They were expensive but I began to wonder how much would it cost to build one ourselves?
Depending on the material chosen, you can build a custom desk PC for around $200-$500, not counting the computer hardware of course. The single most expensive part of the build is usually the glass top but there are a lot of ways to save money on this aspect of the build.
The truth is, building a desk PC case is actually less expensive than purchasing most manufactured “gaming desks” on the market and significantly cheaper than buying a pre-built desk PC case such as the Lian Li DK-05 that averages close to $2000. This, of course, depends on some of the build options you make but by building it yourself you are able to have the best of both worlds, a gaming desk style setup with the built-in PC components of a desk PC.
Read this If you are on the fence about whether or not you should build a desk PC.
What Materials Do I Use to Build a Desk PC?
First of all, unless you have specific knowledge, skills, and tools for building with metals, I strongly encourage you to build your desk PC case with wood. It is much easier material to work with for someone who isn’t experienced.
Now, the next question is, which type of wood should I use? We built our first Desk PC with ½ inch pine plywood. I chose it primarily because it was the easiest wood for me to obtain from my local lumber yard but if I were building it today I would use a higher grade, higher quality wood such as birch. It has a smoother surface with fewer imperfections from the grain. MDF is also a very viable choice for those looking for a really smooth and consistent surface for painting.
Wood is not expensive when you are just purchasing one or two 4X8 sheets. In the end, you will spend less building this yourself than you would for a quality pre-built desk that likely will not meet all of your needs and wants anyway.
Where Do I Buy The Materials for a Desk PC?
Your local Home Depot or Lowes will likely carry most of the materials you will need. The only exception will be the glass top which we had custom cut to our specifications at a local glass store. An important point to note is that you don’t want to have the glass cut until you have put the desk together. This way you can ensure a perfect and square fit.
If you are not wanting to spend the money on a custom fit glass top, you can opt to buy a used slab of glass that is made or a small table for example and build the desk around it.
Great places to go searching for a second-hand glass top for cheap include:
-
- Facebook Marketplace – You can find deals on all sorts of local goods.
-
- Craigslist – Filter down to your area and see if someone is trying to get rid of just what you need.
-
- Flea Markets & Garage Sales – Probably one of the best options for stumbling upon just what you didn’t know you needed but with such a specific product that you will be looking for its somewhat of a hit or miss proposition.
- Local Classifieds – Local newspapers still run classifieds where you can occasionally come across a good deal.
Regardless of how you find it, repurposing a used glass top to build your desk PC is certainly a budget-conscious approach. This strategy was made famous by Linus Tech Tips but just as they ran into build issues by trying to build the desk to match the dimensions of the glass, you too run the risk of this. That’s why the best practice is to cut the glass to the dimensions of the finished build.
And by the way, I’m not picking on Linus Tech Tips about this because even though we did order a custom glass, we still messed up by ordering it before the desk was built.
Just remember, if you do decide to buy a glass top at a flea market, off of Craigslist, or wherever, you will want to pay particular attention to the dimensions and build your desk so that it fits like a glove. This is certainly an option, it just takes a little more careful planning.
One more option for saving money is to not use a full slab of glass to cover the entire top. You could, if you chose to, have a small window or two into the desk that highlights only the key PC components that you want to accent. Smaller glass means less cost.
One other consideration that bears discussion is whether or not to use tempered glass for your build. There are definite advantages to tempered glass, the single largest one being safety.
Based on the research I have done, tempered glass is remarkably stronger than traditional glass. There is no significant difference in weight either. What really sets it apart though is the way that it breaks. Tempered glass essentially crumbles into small round pieces instead of breaking into large dangerous shards like traditional glass.
For our build, we decided not to use tempered glass as it is significantly more expensive (we only paid around $80 for our glass vs. around $270 for tempered of the same ¼ inch thickness). If there is any concern that the glass will be broken once it is in place then it’s definitely worth considering tempered glass for your build just be aware of the additional cost.
I will say this. For our next build, we are going to use tempered safety glass. It will break our previous $200 budget but I’ll sleep better and that’s worth something. As an added bonus, you can actually order custom-cut tempered glass online and have it delivered straight to your home. Pretty sweet.
How Do I Learn How to Build My Own Desk PC?
This is the fun part and I want to help you with this. The purpose of diydeskpc.com is to provide you with all of the information that you need to build your very own computer-in-a-desk setup. My son and I have already done the hard work of making all the mistakes and learning the right way to do this. I plan to save you countless hours and lots of headaches.
I am currently in the process of documenting a complete video series that will walk you through every single step of the build from design considerations to finally installing the PC components and turning it on for the first time. Even if you have never build anything with wood before or every built a computer from parts, everything will be covered in detail and documented on video.
That’s on the way but for now, let me just reassure you that you can absolutely build this yourself. Look around this website and start gathering ideas (and take note of my documented mistakes).
Going from Lame to Game!
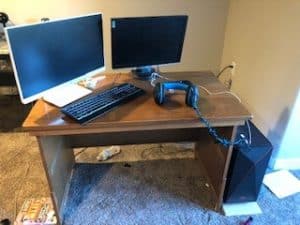
My son was previously gaming on a small desk that was very cramped for space. It barely had room for two monitors, the keyboard and mouse.

It was a sad situation to be sure. The irony is that this desk is made from an old dresser drawer that my wife no longer wanted and I had decided to take apart and build something with. I had no idea what I was doing. I just screwed the pieces together. It served its purpose but it was past its prime and time for us to step up the game.

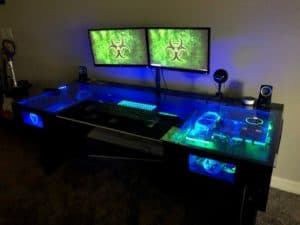
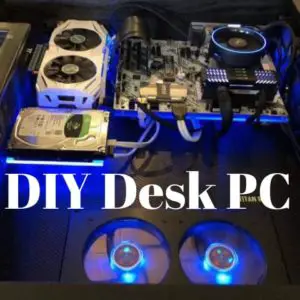
This is my son’s set up now. It’s a large desk with the computer actually built into it and covered with a ¼ inch thick glass top. It makes great use of space because he doesn’t have to find a place to sit his desktop computer anymore and I don’t have to worry about the excessive dust being sucked into the system due to it sitting so close to the floor.
Considering that we built this desk for less than we would have paid for a “gaming desk” and the fact that the PC components are incorporated into the desk itself, I’m very happy with the decision we made.
If you want to save money and build your own desk PC, have a look at this post on designing your desk PC case.

