One of the most exhilarating parts of building your very own desk pc lies in the conceptualization and design. This is when you lay awake at night dreaming of all the cool aspects that you want to incorporate into your design. A panel on the front for USB, headphones, and mic? Maybe a car stereo and speaker system to really thump the bass? Or perhaps a space station design that looks more like an interstellar command center than a desk. The sky is the limit when your imagination is running wild with possibility.
When it comes to putting pencil to paper and actually drafting the layout, however, a few considerations will come into play. The amount of time you are willing to commit to the project, your knowledge, and skill set in building, and the inherent limitations of the project you are building will all influence your final design to some extent. I’m going to be posting a complete step by step design guide in a future post to walk you through the process but for now, let’s explore a few key aspects of design that you need to keep in mind.
Source Material
Depending on your skills, you may choose to build the frame of your desk PC out of metal or wood. I favor wood personally as it is easier for me to work with and generally less expensive. I have a more in-depth overview of the benefits, challenges, and considerations of metal vs. wood building materials that may provide more insight if you are on the fence about which material you should use.
Desk PC Dimensions
Deciding on the right height, width, and depth of your desk PC case is a personal choice based on your needs and unique situation. Space availability and personal preference will likely be your primary motivators in this decision. I’ve written a detailed post on the best dimensions for a desk PC that will provide you with important guidelines in this stage of the planning process.
Cable Management
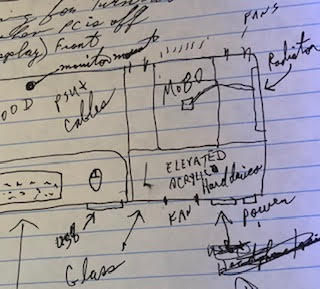
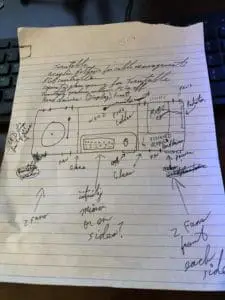
One of the biggest mistakes I’ve seen in designing desk pcs is in the lack of consideration for cable management. The countless cables connecting and powering fans, lighting, pumps, hard drives and whatever cool electronic props you may choose to add to give your desk that extra “wow” factor results in an overwhelming mass of cables that have to be tamed. Too many times I have seen enthusiasts design and build amazing looking desk pcs only to overlook this glaring issue. As a result, their desk looks incredible from above, but as soon as you kneel down and take a look at it straight on you see the mass of cables dangling from underneath. There are multiple solutions to this. My son and I came up with a simple solution ourselves of building a 3.5-inch pocket underneath the desk to allow for clean cable management. This also allowed us to improve the strength of the desk with 2 x 4 bracing that would not be visible without literally getting down on the floor and looking up from underneath. Instead of sitting each of the side walls on the top of the desk, we secured them to the side of it. I’ll post pictures with a full explanation of this in a coming post but for now, the takeaway is simply this; take the time to factor in cable management in your design. It’s a critical step to ensuring a clean build.
Air Flow
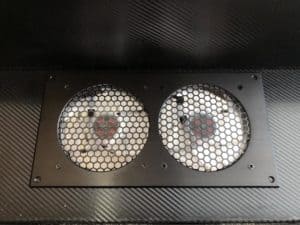
Probably one of the most polarizing topics when it comes to building a desk PC or even building in prefab cases, is the controversy over airflow. Positive vs. negative airflow, movement of heated air out the back or the top, and fan speeds and sizes are discussions that heat up regularly on Reddit and YouTube video comment sections. Everyone is an expert, yet most have never actually done it. They’ve watched a video or read a review and as a result that has a conviction on what is right and what is wrong. The truth, however, is that although there are certain guidelines that are beneficial to keep in mind, air flow is a fairly simple concept. The goal is to pull cool, filtered air into the desk and exhaust the warm air out. Our desk has seven filtered intake fans and only two exhaust fans. Why? Well for one, a filtered intake fan moves less air than an exhaust fan which is unfiltered. Additionally, we set the system up to allow the fans to run at a slower speed except under strenuous demand. This keeps the noise level down when you are just doing casual computing. The third reason for this ratio is that we wanted to ensure a significant positive airflow in the system to ensure minimal dust collection. When you have that much cool air going in, the warm air will find a way out. Even when we completely shut off our exhaust fans we can still feel a noticeable movement of air exhausting out of the opening. Don’t fall into a rabbit hole of controversy on air flow in YouTube comments and forum threads. Keep it simple and push cool filtered air in and give the warm air a way to escape. Physics will take care of the rest.
For more on airflow design read this post on ensuring proper airflow in a desk PC case.
Liquid or Air Cooling
While all components of your system will generate at least some heat, the majority of that heat will come from your CPU and graphics card. Liquid cooling these components is definitely an option and you can really add some style and wow factor with a liquid cooling water loop. You will increase the cost of your build to some extent but we have had great success with some less expensive parts on Amazon and have even replaced those pricey compression fittings that most people use with simple fuel line pinch fasteners that are used in vehicles. You don’t even notice them and they do the job for a fraction of the cost. When we first built our desk PC the CPU cooling block that we wanted was out of stock and we weren’t even thinking about cooling the graphics card because we intended to upgrade it in the near future. Still, we wanted that look of water flowing through our system. What we ended up doing was running a loop from the pump through a couple of reservoirs just for the visual impact. It was not connected to any components and was providing no cooling to the system at all. He kept it like that for quite a while even after the CPU cooling block was finally back in stock in part because our system was doing so well with only air cooling. Why? Because we designed our system to force the warm air out! My son had the cool green UV reactive liquid that complemented the bio-hazard theme we’d created and we knew that when the CPU cooling block we wanted was available again, we could simply add it in.

While we are on the topic of liquid cooling, there is another important yet controversial consideration you’ll need to decide on. Will you use a hard line or soft tubing? Generally speaking, the hard line is more difficult. Soft tubing is fast and easy based on our experience. It all comes down to what you envision for the final build.
Remember, this system is yours. You need to design it the way you want it. If liquid cooling is the route you want to go, have at it. If not, you can absolutely ensure reasonable temps in your system under demand with air.
Tempered Glass? Yes or No?
At the end of the day what really separates a desk pc from any other traditional desk is that sexy slab of glass that lays on top and allows your friends to gawk in amazement at your high tech ecosystem that lays below. Glass is potentially dangerous if it breaks. A person could suffer serious injury. Tempered glass is considered a safety glass which is said to be of higher strength and has a tendency to crumble when broken instead of shattering into sharp shards. Ideally, this is the glass you would want to use. The cost of tempered glass, however, can be significant. We ended up using 1/4 inch this traditional glass that was custom cut to fit our desk and cost us around $80 at a local glass shop. As long as no one takes a hammer to it I don’t think we will ever have an issue. it’s thick. If you anticipate the potential for breaking for any reason, however, I would strongly recommend exploring tempered glass solutions. Wikipedia has some general information on the benefits of tempered glass here.
Cost
So the sky is the limit when it comes to your imagination but our pocketbooks are generally less forgiving. When my son and I set out to design and build a desk PC, the cost was a major factor. We didn’t want to throw all of our money into the desk. The majority of the investment would be in computer components so we were very cost-conscious in our design. We used 1/2 inch plywood pre-sanded on one side and plain old 2 x 4 studs for the bracing underneath. I’d like to build our next desk PC out of birch or oak but that’s the beauty of all of this. Your first build will be amazing but it doesn’t have to be your last. Build something that fits your budget for now and in time you will not only come up with ideas on how to improve the design but also have more understanding of what you are doing which will increase your possibilities for your 2.0 build.
For more information on cost, see How Much Does It Cost To Build A Desk PC.
Are you ready to build your own DIY Desk PC? Here’s the Step-by-Step process for building a desk with a computer inside it.