
We made a desk PC… and we made our share of mistakes. Some of those we were able to adjust for and a few we had to just live with. Don’t make the same mistakes we did.
When building a Desk PC case, here are six simple but important mistakes to avoid:
- Don’t get ahead of yourself. Plan out each step and follow the plan.
- Don’t overlook airflow.
- Don’t make the design so complicated that you can’t figure out how to build it.
- Make sure your desk is strong and sturdy.
- Don’t forget to square your build BEFORE you glue and nail it and by all means,
- Don’t be afraid to Ask for help if you need it.
Let’s go over each of these in detail.
Mistake #1 – Getting Ahead of Yourself
I’ve already shared my embarrassing mistake of ordering our glass surface before I had the desk PC cut and assembled. Let that error serve as a shining example of getting ahead of yourself. Designing and building a desk PC case is a step by step process and so long as you follow the steps you will be fine. When you try to shortcut steps or skip them entirely like I did costly or unsightly mistakes can happen.
Here’s a few things we ran into along the way.
- Double check you measurements. The old saying “measure twice, cut once” will save you a lot of headache if you follow it.
- Speaking of measurements, make sure that the size of the desk you are planning is appropriate for the space its intended for.
- Don’t order glass before you have assembled and validated measurements (trust me this is worth repeating)
- Account for mounting of all of your PC components. These include:
- Motherboard
- Hard drive(s)
- Graphics card
- Power supply (we mounted ours on the underside to keep exposed cables to a minimum)
- Fans (both intake and exhaust – more on that coming up)
- Any liquid reservoirs and pumps if you plan to incorporate liquid cooling into your build.
Generally speaking, you should have more than adequate space for these components. That’s one of the great benefits of designing and building a Desk PC case. At the same time, you do have to keep in mind that the components have to be relatively close to each other. We chose to build the PC components into one side of our desk and use the other side for theme props and some liquid cooling components. So keep cable lengths and component proximity in mind as your plan out your build.
Mistake #2 – Overlooking Airflow
I choose to look at this one as less of a mistake and more of a miscalculation in our build ;).
I’ve outlined the challenges we ran across with airflow in a previous post but the quick and dirty of it is this – it takes more fans to move cool air into your system than to exhaust it. Why? Because the intake fans are filtered and the resistance of the filtering reduces the amount of air brought into the system by comparison to an unfiltered fan. I’d also strongly recommend a straight directional airflow. In other words, if air is to be exhausted out the back, pull air from the front. If you have air pulling in from the sides and exhausting out the back you may end up with air pockets where circulation is impaired. It’s not a make or break for your system as many PC cases are equally inefficient but just know that air that sits in a system warms up and can increase the ambient temperature of the case. There’s some trial and error to getting and maintaining the right air pressure in a system but it’s totally doable and I tend to obsess over airflow more than most. Read my previous post on airflow for a lot more detail on this.
Mistake #3 – Letting Your Ambition Exceed Your SkillSet
Now I need for you to hear me on this and really understand what I am saying.
It’s easy to look at taking on a project like this and think “I don’t have the experience to do this. Why even try?” That’s not at all what I am telling you at all. You can absolutely build a DIY Desk PC. What I’m saying is don’t map out a plan with so many special modifications in the design that no reasonable person without very special skills could actually build it.
In its simplest form, a desk PC is a big box sitting on legs with a glass top on it. You can build a box. You can build some simple legs. We can even get a little crafty and design the box with some special but simple design features. We can spruce up the legs with a little creative cutting. But if you design the desk so complicated that you can’t even figure out how it needs to be made then you have probably let your imagination write a check that your hands and sweat can’t cash.
I ran into this some time back with a buddy of mine who was taken with our build and wanted to create his own desk PC. He drew up an admittedly impressive design that included a car stereo, built in wireless charger for his phone, independant fan controllers, and some of the most creative wordwooding ideas I could have imagined. I had no doubt that I could give him guidance on the car stereo, phone charger, and fan controllers. Where I couldn’t help him and what eventually made this design end up in a forgotten pile of papers somewhere was the design of the desk itself. It was crazy complicated. It had all these drawers and fold out sides and was an intriguing but perplexing U shape. I’m sure a professional woodworker could have built what he envisioned. He, nor I, however, were professional wordcrafters and it just simply beyond our current capabilities.
So here’s the takeaway. Keep it simple unless you have access to a professional. The fun in this is doing it yourself. Don’t make the design so intimidating that you aren’t able to build it.
Mistake #4 – Not Ensuring a Sturdy Build
When the bottom of the desk was assembled, I was disappointed and a little terrified to find that the middle sagged. By lining the bottom with 2X4’s I’d thought I had overcompensated for this. It turned out that my error was in cutting around the knee cut out with the 2X4s.
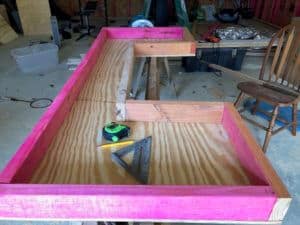
It took me a little time to figure this out but once I did I realized that all I need to do was to replace the short 2X4 that ran along the back of the knee cut out with one that ran the length of the desk.
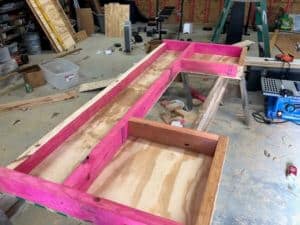
Once I made this modification, the bottom was rock solid.
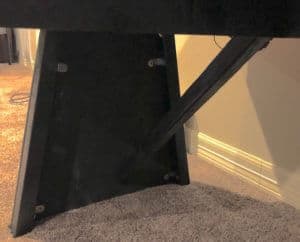
We found a similar challenge when we installed the legs. The desk would wobble side to side and felt very unsteady. We ended up building some quick and easy cross bracing and once those were screwed into place the entire desk is solid and sturdy.
Mistake #5 – Forgetting to Square Your Corners
Some mistakes are just downright embarrassing. I’m not a professional carpenter but I have common sense. Still, I missed this one and it caused some issues for me.
Learning to use a framing square or a speed square is not difficult at all for this type of build. All you are wanting to do is to ensure your corners and the sides of the desk are at a perfect (or as close to perfect as possible) 90 degree angle. This begins with the cut for your desk bottom. Measure length and width at each end and in the center and make sure that if it’s 30″ from front to back on the left side it’s the same in the middle and on the right side. Ensure that the width is the same in the front as the back.
The mistake I was was when I began attaching the sides to the bottom plate. I was so focused on ensuring that my corners met up that I didn’t take the time to make sure that they were standing at a 90 degree angle. After I had a couple of them attached I noticed that the corners were not lining up correctly. I had to remove them and start again which involved some sanding and repainting to cover my mistakes. This is a simple process but don’t get in a rush and gloss over it.
Mistake #6 – Not Asking For Help When You Need It
When my son and I built our desk PC case, there was very little instructional information that I could find on how to actually do it. I just sort of looked at pictures, thought to myself “I like that” and ran then by my son for approval. Once he blessed the concepts I then set out to draw the whole thing out. I didn’t have 3D drafting software, I wasn’t an experienced workcraftsman by any means, and I didn’t have the best tools on the market. What I had, frankly, was an idea and determination. I made a lot of mistakes along the way but I did it. And you can too.
But here’s where you are in a better position than I was. You do have some guidance. You do have someone you can reach out to with questions.I am more than happy to provide any insight or suggestions that I can to help you with this build. I’m posting everything I can that I believe may be beneficial to you as you design and build your desk PC case. If you run into an issue or have a question at any point go to the Contact Me page and send me a message. I read every email I receive and I’ll get with you and we can figure it out together. If you put your mind to this and your back into it you can absolutely design and build your very own Desk PC case.
Bonus Tip – Don’t Be Afraid To Start
It’s easy to get into analysis paralysis with your design. Second guessing every design decision, trying to predict every possible consequence of those decisions, it can be downright maddening. I won’t spend more time than necessary on this because it is self-evident. If you spend all of your time analyzing and never start doing, nothing will happen. By all means invest the time to design your desk right but at some point you’ve got to get some lumber, pick up a saw and get to work.