When you are building a custom water cooling loop for a PC, it can get pricey as you fill up your Amazon cart with tubing, reservoirs, and fittings. And while I understand the allure of those expensive, high profile accessories, we have to try to build our dream setup on a budget. That doesn’t necessarily mean compromises on performance or aesthetics but it does require us to be smart and think differently. Here are three of the cost-saving solutions that I came up with during our recent build.
- Cheap Fittings for Liquid Cooling
- A Super-Simple and Inexpensive Way to Hide Mistakes When Drilling Holes To Route Tubing
- Cheap Yet Nice Looking Alternatives To Overpriced Reservoirs
Let’s dive in and see if these solutions can save you money like they did for me!
Hack #1 – Cheap Liquid Cooling Fittings For Your Soft Tube Water Cooled PC!
For some reasons, water cooling fittings are ridiculously expensive. I was overwhelmed by the cost of fittings when building our Desk PC but I found a cheap solution that works amazingly well!
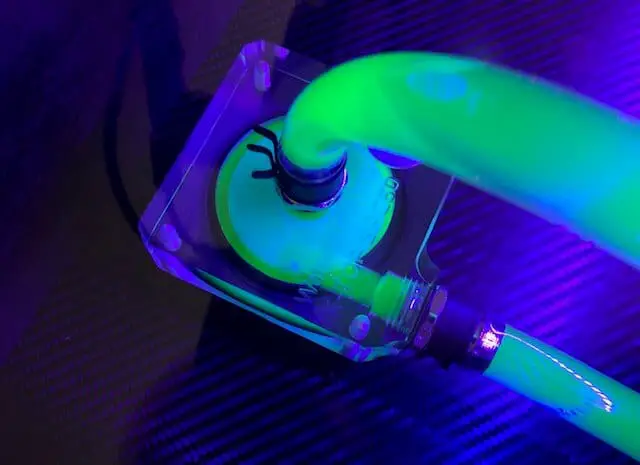
Pinch style hose clamps that are made for fuel lines are cheap and viable alternatives to expensive fittings when using soft tubing in a water cooling loop. Designed to ensure a leak-free seal for automobile fuel systems, these clamps are tried and true solutions to soft tube connections. As a bonus. they are easy to attach and remove while maintaining a clean look for your build.
Here are a few reasons you may want to consider these pinch clamps in your next build.
Money Saved On Fittings Can Be Invested Into Higher Performance PC Components
There is no denying that money invested in a custom water cooling loop could better serve the vast majority of users by being invested in a higher speed processor or ultra-fast NVMe drive. Every dollar counts and while building a sexy custom loop into your system adds to the aesthetics of your build, it makes sense to save money where you can. In the case of fittings, a significant amount of money can end into a relatively small number of parts depending on the brand and type chosen. While this approach will not work for a hardline tubing system, it is a great cost-saving measure for those who are utilizing soft tubing in their build. And those saved dollars can go toward increasing the performance of your system!
Fuel Line Pinch Clamps for PC Water Cooling Loops are Non-Obtrusive
Given their slim, low profile design, these clamps do not take away from the aesthetics of your build. Granted, they don’t add anything to it either but does a fitting really need to be a showcase item? I suppose that is up for debate and if you are someone who is looking to save money while still having the glam of custom fittings in your system, there is another option that you may want to consider…
Use Custom Fittings For High Profile Areas And Pinch Clamps For The Rest

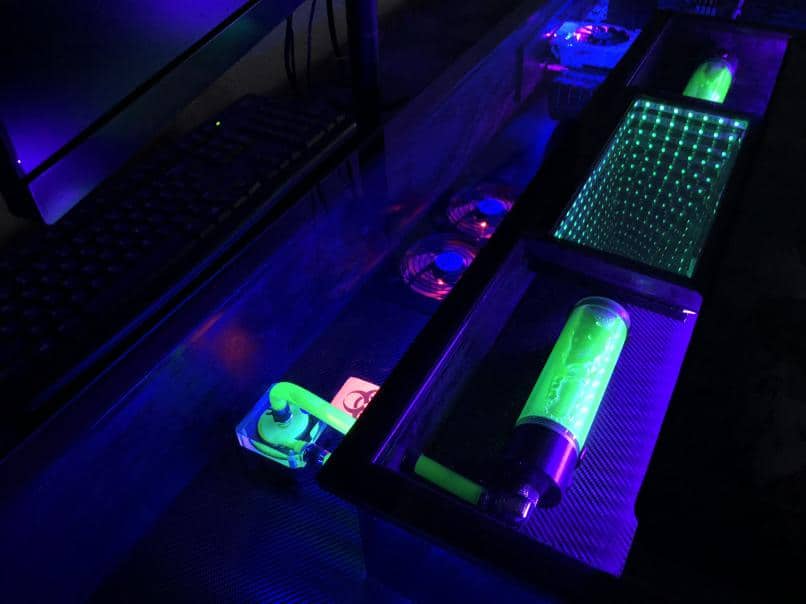
When building our Desk PC, the main showcase items in the water cooling aspect of our build were two reservoirs that my son wanted green UV fluid flowing through to represent toxic waste (it was a biohazard themed build – click here for tips on designing a theme for your desk PC). For this part of the build, we used a custom fitting. Partially because it was a high profile area and partially because we needed a 90-degree turn coming right out of the reservoir.

For every other connection, however, we opted for the cost-savings of fuel line pinch clamps. In our case, we simply saw no logical reason to invest in expensive custom fittings in areas that were low profile or, in some cases, completely out of view.
Pinch Clamps Can Be Quickly Removed When Cleaning Your Water Cooling Loop
Cleaning a water cooling loop is not the funnest thing in the world. In fact, it ranks right up there with sanding wood on the list of things I really do not enjoy. Still, it is necessary evil of custom loops. One of the hidden benefits of using fuel line pinch clamps is the ease of removal. With a pair of pliers (or even your fingers if you prefer) you can pinch the clamp and slide it back, leaving it on the tube so that it doesn’t get misplaced but freeing the tube to be removed from whatever cooling component it’s fitted with.
I really like quick and easy solutions to issues and these have turned out to be a great option. Best of all, we’ve had zero issues with leaking when using these pinch clamps. When you really think about it, if these clamps are designed and trusted to ensure leak-proof connections in a fuel system for automobiles, they must be good. Based on my experience, I can’t imagine not
We used black 1/2 pinch clamps for our build since we were using 1/2 inch tubing. You can check the latest prices on these inexpensive water cooling fitting alternatives at Amazon by clicking here.
Hack #2 – Hide Imperfections When Routing Tubing Through Walls
There are easy ways to do things and there are hard ways. When it comes to routing tubing in a desk PC, I managed to try the hard ways and then figure out the easy ways after the fact.
The key to routing liquid cooling tubing through your Desk PC lies in the use of specific drill bits and rubber grommets that ensure a clean, finished look for your build. Below are tips on how to route your
Necessity Is The Mother Of Invention
My son sometimes has high expectations for me. When building his Desk PC case he decided that he wanted two water reservoirs for the liquid cooling loop in separate showcase boxes from the rest of the build. The idea was to elevate these reservoirs so that they were just below the glass top. Easy enough, or so it seemed until the time came to start drilling holes and routing the tubing.
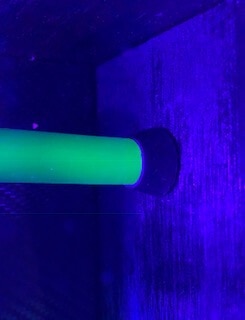
Since we were using 1/2 OD (outer dimension) soft tubing, I purchased an inexpensive drill bit set similar to this one on Amazon that included a 1/2 inch bit. I began by measuring where the holes would need to be drilled. I wanted to keep the majority of the loop under the desk and out of sight so that only showcased parts of the loop were visible. This meant boring straight down through the desk and routing the tubing out of the reservoir with a 90-degree fitting. This provided a nice look except for the hole that the tubing when through. While it wasn’t terrible I didn’t feel that it looked finished enough just having the tubing going through a hole in the wood bottom.
Rubber Grommets To The Rescue!
Sometimes the solution is a problem can be found in the solution to another problem. While searching for a way to cover the imperfections of the drilled holes, I ran across rubber grommets that are actually marketed for hydroponics projects. Amazon sells a similar rubber grommet to the ones I found at a local store. In each place where the tube was being routed through a drilled hole, I inserted the tube through the rubber grommet (it was a tight fit and took a little wiggling but that’s what I wanted, then simply pressed the grommet against the wood backing. Because it held so tightly on the tubing, it did not have to be glued to the wood and in the end, it turned out to be a very inexpensive way to trim out the places where the liquid cooling tubing entered and exited.
Part of the fun in building a Desk PC is in finding simple solutions like this using parts that are intended for completely different projects. Every step of the building process gives you the opportunity to study and come up with creative solutions. That’s almost as rewarding as the finished Desk PC.
Almost. 🙂
Hack #3 – Cheap Water Cooling Reservoirs!
I must admit to being taken aback somewhat by how proud manufacturers are of their reservoirs for custom water cooling loops. I figured out quickly that by making a few compromises that wouldn’t significantly impact the visual appeal of the build, I could save a decent amount of money.
Forego Glass For The Sake Of Cost
Glass reservoirs are pricey. We opted for less expensive acrylic reservoirs and I have no regrets. They look great and work perfect for our situation. I can see investing in glass reservoirs if I were building a $10,000 system with every premium accessory on the market but when you just want a good looking build on a budget, the cheaper acrylic reservoirs are perfectly fine. Looking at them, you wouldn’t know that they are not glass anyway.
Plastic or Acrylic Casing Is Less Expensive Than Metal
At each of the glass or acrylic reservoir is a casing that the reservoir usually screws into that includes ports for tubing to be connected. Premium reservoirs often have casings made of metal and those can be really nice looking. However, if you are on a budget and want to build a custom loop for your system, consider a reservoir that has plastic or acrylic casings. This is not an accessory that is going to be handled often. It is going to be secured into your system, filled with the liquid cooling solution of choice, and left alone. The two acrylic reservoirs that we purchased has plastic casings on the ends and they have given us zero issues. They have rubber gaskets to ensure a leak-proof seal and they just sit there churning liquid cooling solution day after day. We are running Koolance UV fluid through them and they really glow! There are some inexpensive
Recommended Inexpensive Reservoir Options

Barrow manufactures a quality reservoir using an acrylic tube that’s

I purchased our acrylic reservoirs from P.Lotor off of Amazon and, though they are often not in stock, I can wholeheartedly recommend them without any reservations. They are the ones that we rely on in our Desk PC case.

If you are needing both a reservoir and a pump, BXQINLENX offers a combo kit with an acrylic reservoir and pump for a very reasonable cost. The pump is rated at 158.5 gallons per hour and uses standard G 1/4 fittings. You can check the latest price on this combo kit from Amazon by clicking here.
Summary
I learned some valuable lessons during this build and I’m hoping that sharing them with you I can save you some time and headache while helping to give this aspect of your build a finished look on a budget.
I do understand wanting to buy the premium cooling components and if your budget allows for it by all means have at it. I just don’t want you to think that a custom loop is out of reach. With a little ingenuity and some careful selection of inexpensive parts, you can build a custom loop for your system at a price that won’t break the bank.
If you are interested in building a computer system in a desk, you really need to read my step by step build log where I walk through the entire build process. There is nothing that will make your setup the envy of the neighborhood more than a DIY Desk PC!