This is the first in a series of Builder’s Spotlight interviews, the purpose of which is to focus on real people who take on the challenge of building their own computer-in-a-desk setup. Without the help of official sponsors or build teams, these individuals show that a DIY Desk PC is within the reach of anyone who is committed to being a part of the Desk PC Revolution!
Gonçalo Costa describes himself as having no previous experience in IT or wood crafts. Despite his humble demeanor, however, Goncalo found the passion and determination to build his own DIY desk PC – codenamed Aaetpio, after watching a budget desk PC build video on YouTube. Though he may have appeared to lack the technical and wood crafting skills one would think necessary for an undertaking like this, Goncalo was determined to join the Desk PC revolution. His journey serves as an excellent example that anyone who truly wants to build their own custom desk PC can absolutely do it.
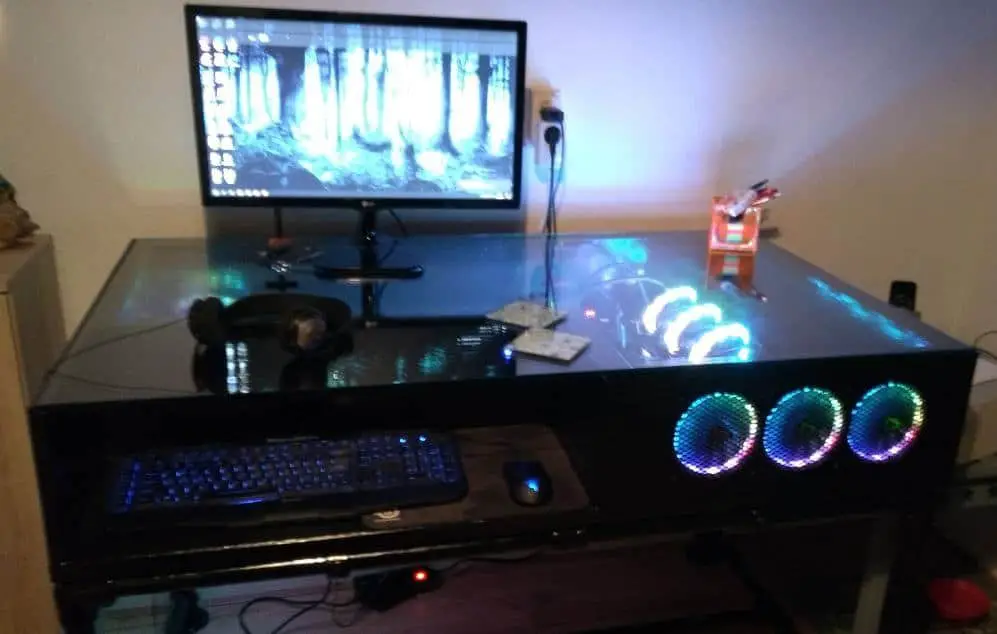
Below is Goncalo’s review of his build from his YouTube channel, showing the completed project and aspects of his innovative design as well as his reflections on areas that could be improved upon by inspiring future builders.
Let’s walk through this process with Goncalo and see what insights we can gain from his journey.
Why Build a Computer in a Desk?
With all of the focus these days on going smaller with micro ITX cases and paper-thin laptops, what inspired you to build a desk PC?
Having been a laptop user myself for many years, while the mobility can be handy, I’ve always felt them
Desk PC Design and Concept
Can you share a little about the general design and what features or qualities you were going for?
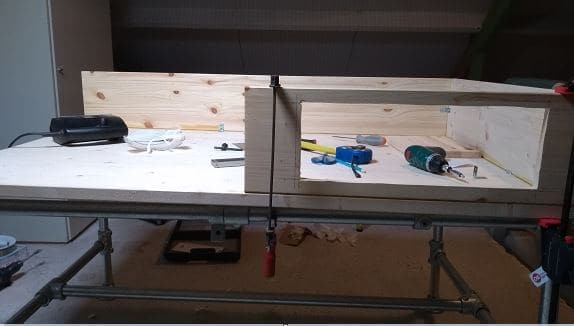
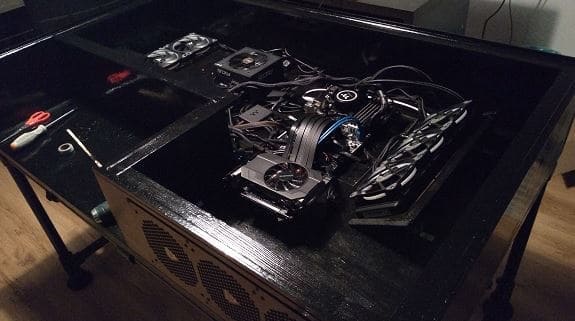
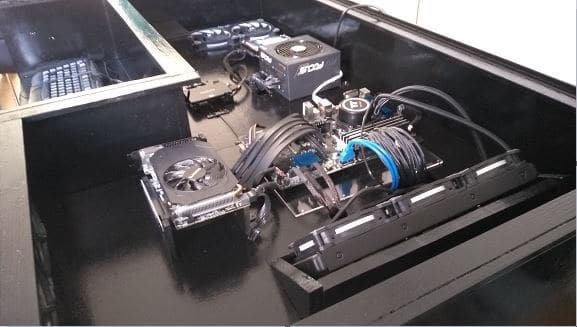
Design-wise I definitely wanted to have fans on the front panel for aesthetic purposes, as well as being able to have enough space to place all components separately as if to showcase them – which also makes maintenance easier, and leaves room for adding a water-cooling loop in the future. On a more practical level, I decided to have a cutout platform under the glass for keyboard/mouse purposes – this is mostly with leg space in mind. Since I’m a short person, having them on the glass would mean my legs would likely not fit very comfortably under the desk. While I’m happy with how it all turned out, the design of the desk does reflect me having literally zero experience in woodworking prior to this project. I went with a safe square-ish form with 90-degree angles, and chose for a steel support frame which while very sturdy, could look a lot better. There were many lessons learned, and for the next one I’ll take more risks for sure – challenging yourself can be the most fun part! And if a complete newbie like me could do a project of this scope, if anyone’s considering trying – go for it!
Author’s Note – This is one of the most innovative aspects of Gonçalo’s design. By placing the keyboard and mouse under the glass, he not only solves the ergonomic challenges he was facing but he simultaneously creates a solution to having the cables from a keyboard and mouse strung across the glass top to the back, diminishing the clean aesthetic of a desk PC build.
Desk PC Case Plan and Layout
I noticed you from your YouTube video that you designed your layout and
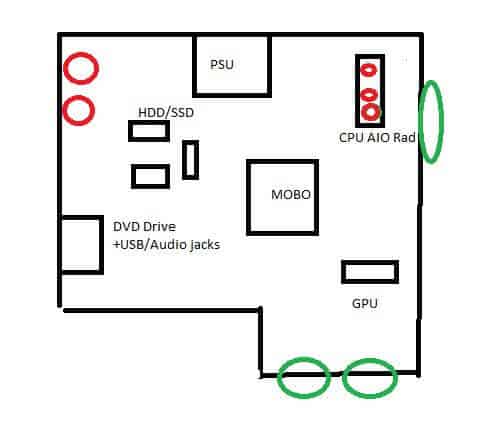
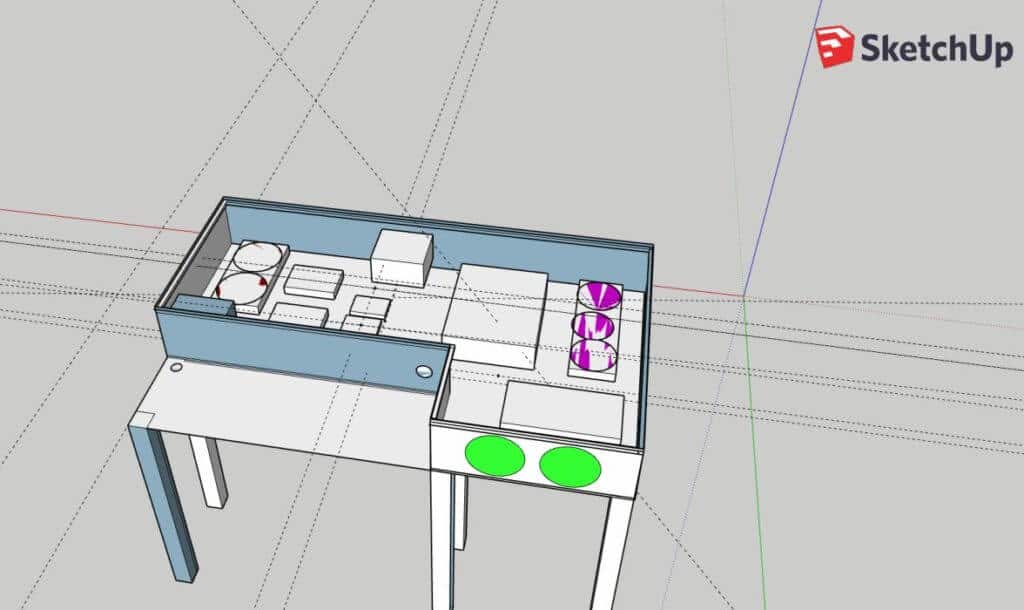
I did my basic design on paper before doing a 3D model of it. While not essential, I do feel a model helps massively with planning and visualizing your ideas, as well as taking measurements. However, I don’t feel like you need experience with 3D modeling – I didn’t have any either myself, my closest endeavors to that were video and image editing as a hobby. There’s a number of free programs out there that are quite easy to use, like Google’s SketchUp. You don’t need a fully detailed texture model either, just a basic shape. For component placement,
Desk PC Leg Support
Can you give an overview of how you approached building the legs for the system?
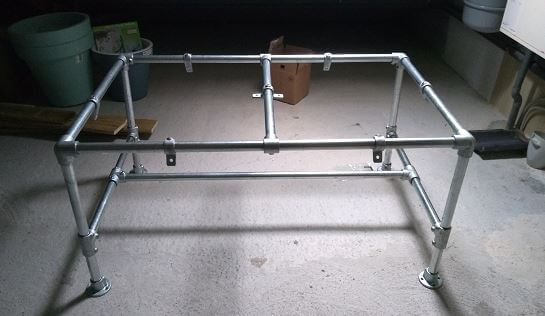
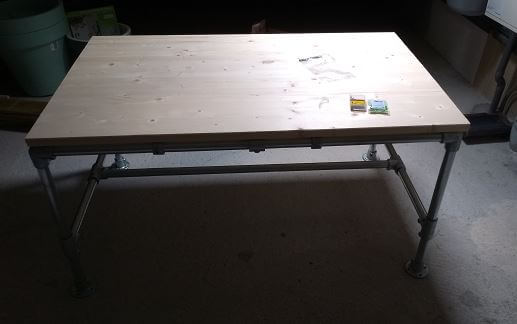
I’m afraid I went the easy way out on this one. Due to my lack of experience in woodworking, I was not entirely confident in my ability to make the legs and midsection support sturdy enough to hold in the long run, stop it from sagging in the middle, and holding the weight of the glass. So I got a cut to size, DIY set of steel scaffolding pipes, that while looking great in some furniture styles, don’t look as great as other desks I’ve seen. Looking back, and given the fact I used solid wood, I could have simply made the 2 side panels all the way from the bottom to top of the desk, and place some support all along the bottom, and it would have been perfectly fine – as well as cheaper and better looking. However, I was also limited by the place I was building on (my attic) and I had to have separate legs to actually fit through the stairs. There’s always the next project to try it on!
Tools Used To Build A Desk PC
Thankfully I was able to finish the project without having to get much in the way of tools that I didn’t already own. I used a jigsaw for most of the
Measuring, Cutting, and Assembly
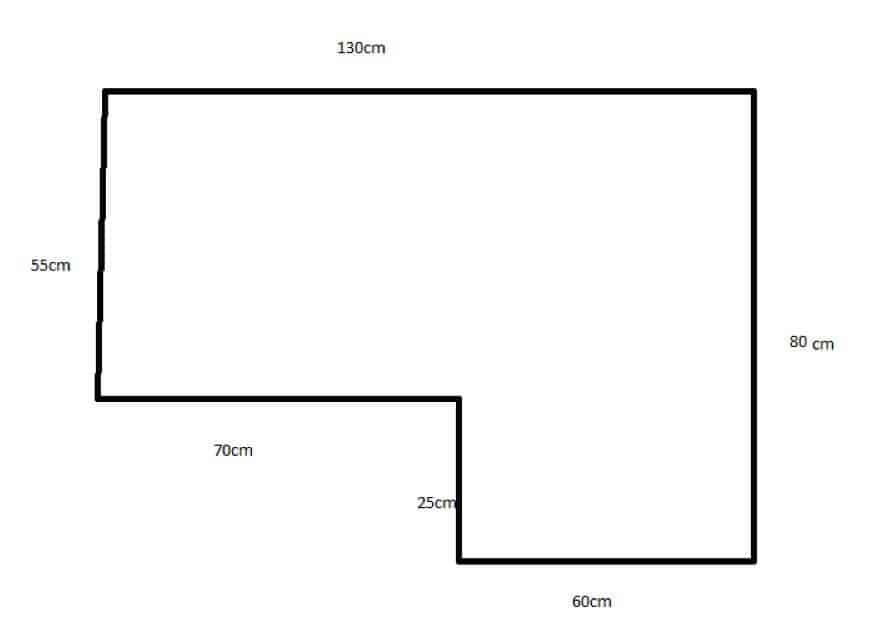
As mentioned earlier, I used Google Sketchup (pretty easy to use even for inexperienced users) to make a 3D model of the desk, accounting for wood thickness and all. There I could easily measure the needed size of each panel on the model, although you could easily plan and measure on a paper drawing as well. I then cut it with the jigsaw. A table saw would definitely be easier, but it did the job. As an alternative, if you purchase your wood at a hardware/home improvement store, they usually have services to cut it to size for you, which saves a LOT of trouble. Assembling it was pretty easy – I first applied the wood glue with the clamps, making sure it was angled correctly with the square ruler, and when it dried put some screws thru the joints for extra stability, as well as L brackets in places they wouldn’t be visible (the screws and brackets aren’t strictly necessary, since wood glue is very strong – but they might bring you peace of mind that you made it as stable as possible).
Planning Airflow For A Desk PC
How did you address airflow in this desk PC? And where does air pull in and exhaust out?
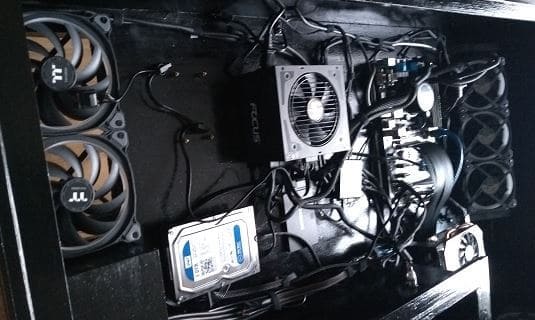
Many of the people I told about the project had questions, and the first one usually was “Isn’t it going to just catch on fire?”. Besides the fact your PC will never run at the (literally) hundreds of degrees needed for wood to combust, I have had zero issues with temperatures so far. A desk build has a lot more space under that glass than any computer case – so much that it actually behaves almost like an open air build. You do however need to have enough fans going to renew that air at least a bit – I have 3 x 14cm and 3x12cm (on the radiator) as intake with dust filters, together with 2x14cm fans as exhaust. The extra intake helps maintain positive pressure to keep it dust free, and if the exhaust fans aren’t enough, air blows out a bit thru the hole for the power cord anyway. As for the fan positioning, I have 3 fans at the front, 3 fans at the side, and the exhaust at the back on the opposite side. This is an attempt to create an L shaped airflow along the desk interior. It might not be optimal, but I’ve had zero issues so far, not seeing any CPU temperatures above the mid-’30s under load, with an AIO cooler. Granted, it’s not a high-end CPU right now, but I still find it a good sign. The true test will come when I upgrade it at the end of this month!
Build Considerations
What advice would you give to aspiring desk PC builders who may be on the fence about whether or not they can do this?
It feels a lot more daunting when you first start thinking about it that it actually turns out to be. And planning, planning, planning. It’s the most important (and tricky) part of it, much more than the execution.
- Does the motherboard go in this position? But if it does, the GPU has to be there so the riser cable lines up.
- I’ll put the SSD on that side, but then I need 65cm of SATA cable – and they only come in 60 or 90!
- Are your PSU cables long enough or do you need extensions? What about access to the motherboard IO?
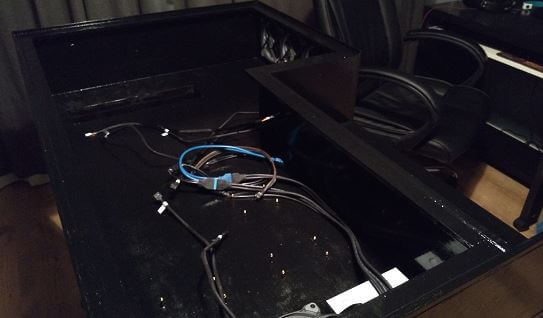
- And Cable Management? (That’s actually a very important point – plan your cabling beforehand. I didn’t, and it was a headache to make it somewhat acceptable… and I’m still not 100% happy with it).
Once you actually start building, however, it sort of comes together naturally – and seeing your vision come to life is incredibly satisfying, and knowing you managed to make your brain-child become an actual thing is one of the most fulfilling moments I’ve had.
Hardware Specs
- Processor – Intel i5-4460
- Motherboard – ASRock H97 Anniversary Edition
- Graphics Card – Gigabyte GTX 960
- RAM – 16GB DDR3-1600
- Storage – Samsung Evo 850 120GB SSD and two, 2 TB HDDs
- Power Supply – Seasonic Focus Gold 750W
I’ve got an Intel i7-9700k, 16GB of G.Skill Trident Z RGB 3600 RAM, and a Samsung 970 EVO NVMe SSD ready, waiting for the Asus Maximus XI Hero that’s currently being shipped… so that’s a bit of a step up!
Author’s Note – I would encourage any aspiring builder to take note of Goncalo’s approach. He did not wait until he had the components for a “perfect build” before designing and constructing his DIY Desk PC. He built the Desk PC with the components he had at the time with the anticipation of upgrading when he could. Don’t wait around until you have the perfect components. Build your desk and upgrade as you go and when you can.
Lessons Learned
Finally, if you were to start over and do this build again, what changes would you make in your design or materials?
Being my very first desk, first case mod, and first time at building “furniture”, there were plenty of mistakes. Most I could adapt and work around, some I still regret, even though I am still very happy with the outcome. For starters, I thought I’d be able to manage the wires better, so I didn’t do a false bottom from the get-go. When I decided to, I had already glued (and thus hard to remove) a profile along the inner side to put some LED strips under. This meant I had to cut the false bottom in sections for it to actually get it in there, which doesn’t look completely perfect. Planning!!! Other regrets include the leg supports I mentioned earlier and the overall shape of the desk. Next time around I’ll aim for an angled front panel, which will improve the looks by a fair margin. I also would place the motherboard with the IO panel against the wood and make a cutout for it, which would save me installing a separate IO for USB and Audio along with all the wiring for it. But those are smaller things, and hindsight is 20/20. I plan to do more desks in the future, so I see this as a prototype and learning experience!
About the Builder

I’m a 30-year-old with no formal education and no past experience in the IT or crafts fields, and everything I know on the subject is mostly self-learned and researched. Working on this first project has encouraged me to follow what used to be a mere curiosity of mine, and take it a bit more seriously. Currently, I have a number of projects in the planning stage, in anticipation of moving houses in a few months. At that point, I’ll have a new working space, as opposed to covering my attic in sawdust (hence my channel’s name!).
The Desk build (I named it Aaetpio, after Ahriman’s familiar in the Warhammer 40k Universe, and planning fitting themed decoration for it is a work in progress too) has been a real confidence booster in what I can achieve as a case modder/builder if I put my mind into it, and turned out better than I thought it would have given that it is a first time build. It also inspired me to start a new YouTube channel to give and receive insight as I explore further into the PC world, as well as short detours into the gaming universe. You’ll be able to find a mix of news, reviews, opinions, and showcases there! It’s aimed mostly at people trying to learn a bit not only about modding, but computers in general. Hopefully, as time goes by and if it gains momentum, I can make it a more serious attempt and expand on it – I still need to learn a lot and experiment a lot, so that also means a lot of content to come!